
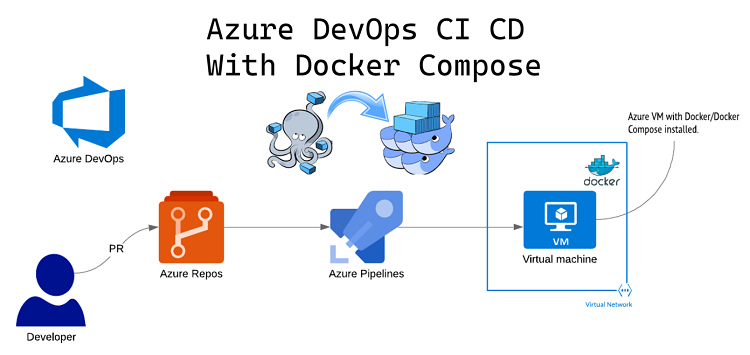
Azure DevOps CI CD With Docker Compose
Merhaba,
-Bu makale de basit bir python uygulaması ve redis uygulamasının CI ve CD adımlarını inşaa edeceğiz.
-Dockerfile üzerinden kodu build ettikten sonra image nexus repository’e push edeceğiz, ve docker-compose.yaml dosyası ile hedef linux makinede bu imajı ayağa kaldıracağız.
-Nexus repository kurulum ve konfigürasyonu için bu linkten diğer makaleme ulaşabilirsiniz.
1-Azure DevOps portal’de bir proje oluşturuyoruz.

2-Azure Repo > GıtHub Import
https://github.com/onuromertunc/dockerexample.git

3-Service Connection Create
-Proje içerisinde nexus repoya erişim için ve SSH bağlantısı için 2 adet servis connection oluşturacağız.
Nexus Registry için;

SSH için;

4-Create CI Pipeline > Pipelines > New Pipeline
Use the classic editor to create a pipeline without YAML


5-Create CI Pipeline Tasks
5.1-Nexus registry connection and login

5.2-Docker Build (Bash Script Task)docker build -t $(Build.Repository.Name):$(Build.BuildId) .
5.3-Docker Tag (Bash Script Task)docker tag $(Build.Repository.Name):$(Build.BuildId) nexusrepo1.eastus.cloudapp.azure.com:8083/$(Build.Repository.Name):$(Build.BuildId)
5.4-Docker Push Nexus (Bash Script Task)docker push nexusrepo1.eastus.cloudapp.azure.com:8083/$(Build.Repository.Name):$(Build.BuildId)
5.5-Docker Compose Change Tag
Bu aşamada, repomuzda bulunan docker-compose.yaml dosyasında image sonundaki tag’i son build alınan imaja ait tagi verebilmek için manipule edip dinamik hale getiriyoruz.sed -i 's/##TAGS##/$(Build.BuildId)/g' docker-compose.yml

5.6-Securely copy files to the remote machine
-Bu task’da repoda bulunan docker-compose.yaml dosyasını deployment yapacağımız makinede bir dizine atacağız. Daha önce oluşturduğumuz ssh service connection kullanıyoruz.

6.Create Release CD Pipeline
New > New Release Pipeline > Empty Job
-Add an Artifact

-Bu kısımda yeni bir Release’in neye göre ve ne olursa tetiklenerek create olacağını seçiyoruz. Aşağıdaki ekran görüntüsünde oluşturduğumuz CI pipeline çalıştığında release yayınlanacak şekilde ayarladık.

-Stage 1’e tekrar geri dönüyoruz ve SSH connection ile deploy yapacağımız target makineye önce docker-compose-yaml dosyasını kopyalıyoruz ve ardından mevcut containerları durdurup, sonra o containerları silip yeni deploy ettiğimiz containerları ayağa kaldırıyoruz.
cd /home/azureuser/deploy

docker-compose stop
echo "#####Durduruldu#####"
docker-compose rm -f
echo "#####Silindi#####"
docker-compose up -d
echo "#####Deploy Tamamlandi#####"
7-Enable Continuous Integration / Continuous Deployment
-Azure repo’da herhangi bir değişiklik commit edildiğinde oluşturmuş olduğumuz CI ve CD pipeline otomatik olarak çalışacaktır.
CI için;

CD için;

8-Test ve Run Pipelines
-Mevcut app.py dosyamızda ufak bir değişiklik yapıp commit’liyoruz.

-CI Pipeline otomatik olarak çalıştı;


-CD pipeline otomatik olarak çalıştı;

-Deployment makinesi üzerinde ki kontroller;
1-CI pipeline’da yer alan “Securely copy files to the remote machine” taski başarılı bir şekilde docker-compose up dosyası kopyalamış.

2-CI pipeline’da docker-compose-changetag taski başarılı bir şekilde çalışmış ve build.id compose içine yazmış.

3-CD pipeline’da oluşturduğumuz “docker-compose-stop-rm-up” başarılı bir şekilde çalıştı. (Hata gibi gözüksede aslında job başarılı çalışıyor)

-Url kontrol ediyoruz ve uygulamamızdaki güncelleme prodda yansımış durumda;
